How to Sharpen Kitchen and Utility Knives Correctly at Home Today
Learn the proven methods, angles, and grit progressions that give your kitchen and utility knives a crisp, long-lasting edge—safely and efficiently.
A sharp knife turns food prep into a smooth, confident task. Dull blades crush tomatoes, slip on onions, and force you to push harder than you should. That extra force leads to ragged cuts and a higher chance of accidents. With the right technique, you can restore a clean apex on your everyday knives at home and keep it performing for months.
This guide breaks down the entire process in plain English. You’ll learn what sharpness really means, the angles that work best, how to pick stones and tools, and the exact steps for creating and refining an edge. You’ll also see how to handle serrations, when to replace utility blades, and how to test sharpness safely. By the end, you’ll sharpen like a pro and maintain that edge with simple habits.
Why Sharpness Matters in Daily Cooking
A refined edge bites into skins and fibers the instant it touches food. Cuts stay straight, surfaces look clean, and delicate ingredients keep their shape. You waste less produce, reduce fatigue, and finish prep faster. Good edges also track where you aim. That control lowers risk because the blade glides instead of skidding across the surface.
Honing vs. Sharpening: What’s the Difference?
These terms get mixed up, yet they’re not the same. Honing uses a rod (ceramic or steel) to realign a rolled edge. It doesn’t remove much metal. Think of it as straightening the very tip after normal wear. Sharpening uses abrasives—stones, belts, or plates—to remove steel and recreate a crisp apex. Hone often to stretch the time between sharpening sessions; sharpen when the blade won’t respond to a few gentle passes on the rod.
Edge Geometry 101: Angles, Apex, and Bite
A blade’s cutting ability comes from a single line where both sides meet: the apex. When the apex rolls, chips, or rounds over, the knife drags. Angle controls the trade-off between durability and razor feel. A lower angle is keener and excels at push cuts; a higher angle stands up to rough work. Heat treatment and steel type matter too, but even premium steels fail without proper geometry.
Recommended Working Angles
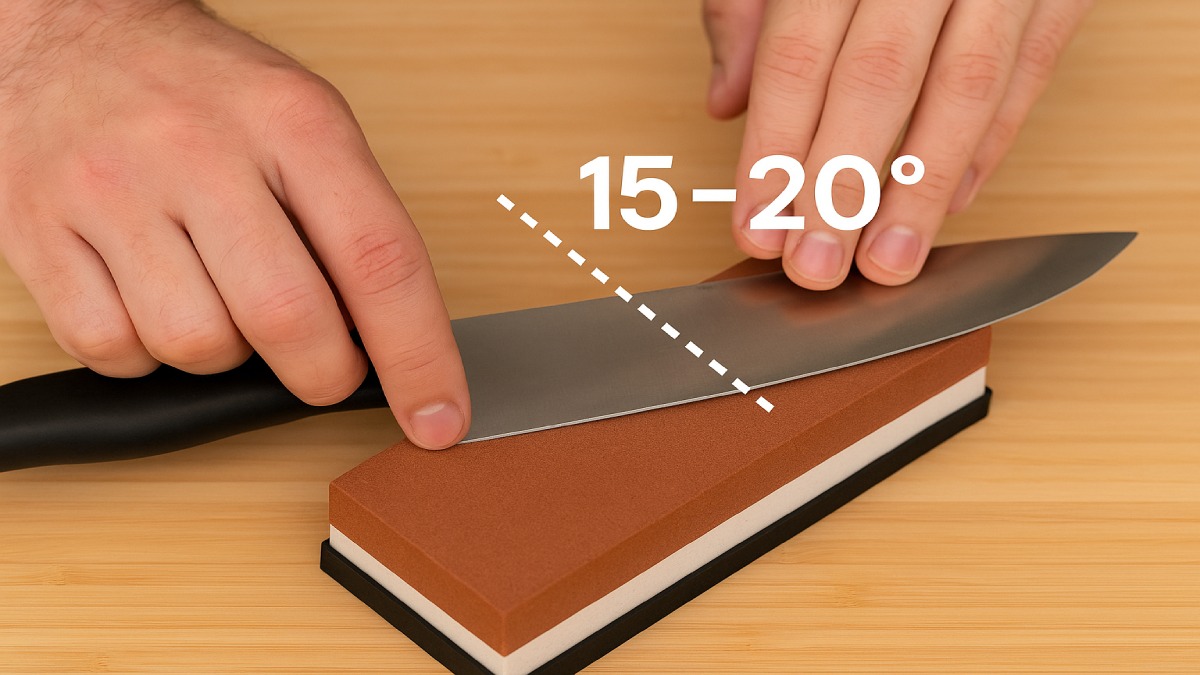
- Western chef’s knives: ~20° per side for a sturdy, all-purpose edge.
- Japanese-style chef’s knives: ~15° per side for fine slicing and precision.
- Paring and utility kitchen knives: 15–18° per side for detail work.
- Heavier cleavers: 20–25° per side for durability during chopping.
Keep the angle consistent from heel to tip. Inconsistency creates a wavy bevel that won’t meet cleanly. An angle guide or a simple coin-stack trick on the stone helps hold the blade at the right height.
Sharpening Tools: What You Really Need
Plenty of gadgets promise instant edges. A few work well; many are aggressive or imprecise. Focus on tools that offer control and repeatability.
Whetstones and Water Stones
Stones give excellent results because they let you set angle precisely and feel feedback from the edge. Here’s a simple grit roadmap for most kitchen knives:
- Coarse (#400–#800): Repair chips, reset a bevel, or fix a badly dull knife.
- Medium (#1000–#2000): Primary sharpening stage for raising and refining the burr.
- Fine (#3000–#6000): Polish the apex, smooth scratch patterns, and boost slicing feel.
Some stones are “splash-and-go” and need no soak. Traditional water stones may need a five to ten minute soak. Keep a flattening plate or lapping stone handy; a flat stone equals a flat, predictable bevel.
Ceramic and Steel Honing Rods
A ceramic rod works for most kitchen steels and helps hard blades that don’t respond well to standard steels. Use light strokes and minimal pressure. The goal is alignment, not grinding.
Pull-Through and Electric Sharpeners
These tools are fast and simple. Fixed-angle guides can help non-experts, and some electric units convert a 20° edge to a 15° profile. The trade-off: many remove metal quickly and can thicken the shoulder over time. Use them for convenience, then tune up with a fine stone if surface finish matters to you.
Guided Sharpening Systems
Jigs and clamp-style systems hold the blade or the abrasive at a set angle. They’re excellent for learning, producing consistent results with less guesswork. They also shine on small blades where freehand control is tough.
Step-by-Step: Freehand Sharpening on Stones
Follow this repeatable workflow. It balances speed with precision and produces a crisp, long-lasting edge.
1) Prep the Station
- Secure the stone on a non-slip base or a damp towel. A sliding stone ruins consistency.
- Soak or splash the stone per the manufacturer’s guidance. Keep a spray bottle nearby.
- Wipe the blade clean. Any grit on the edge can scratch or contaminate the stone.
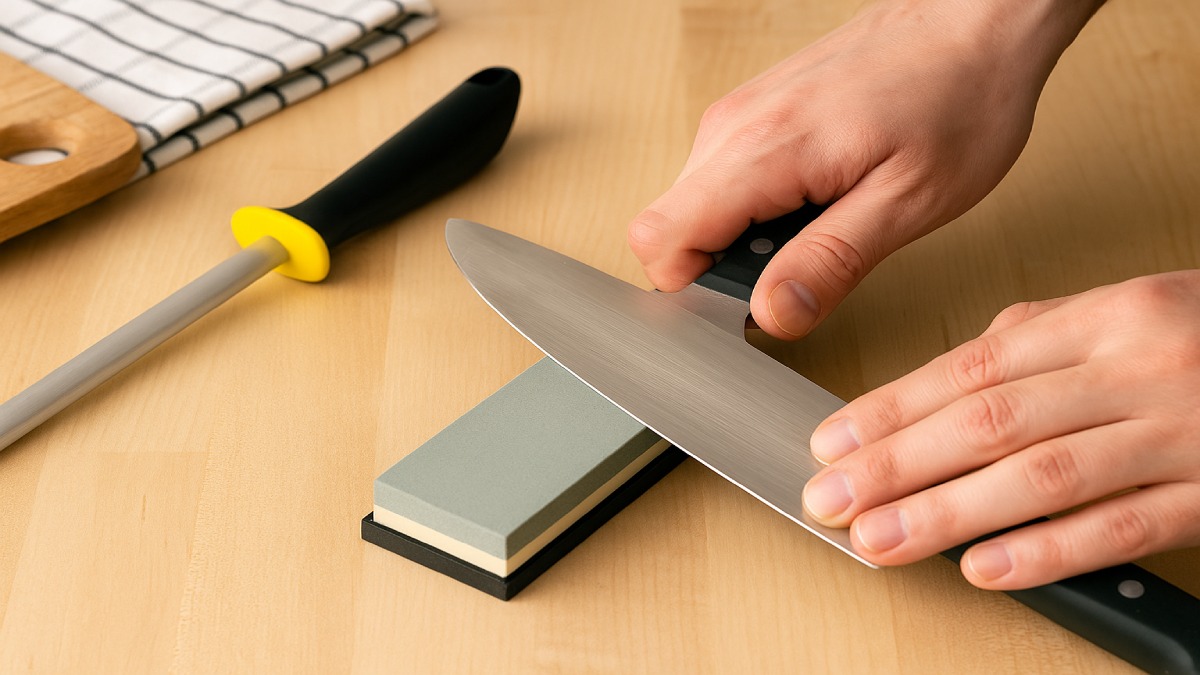
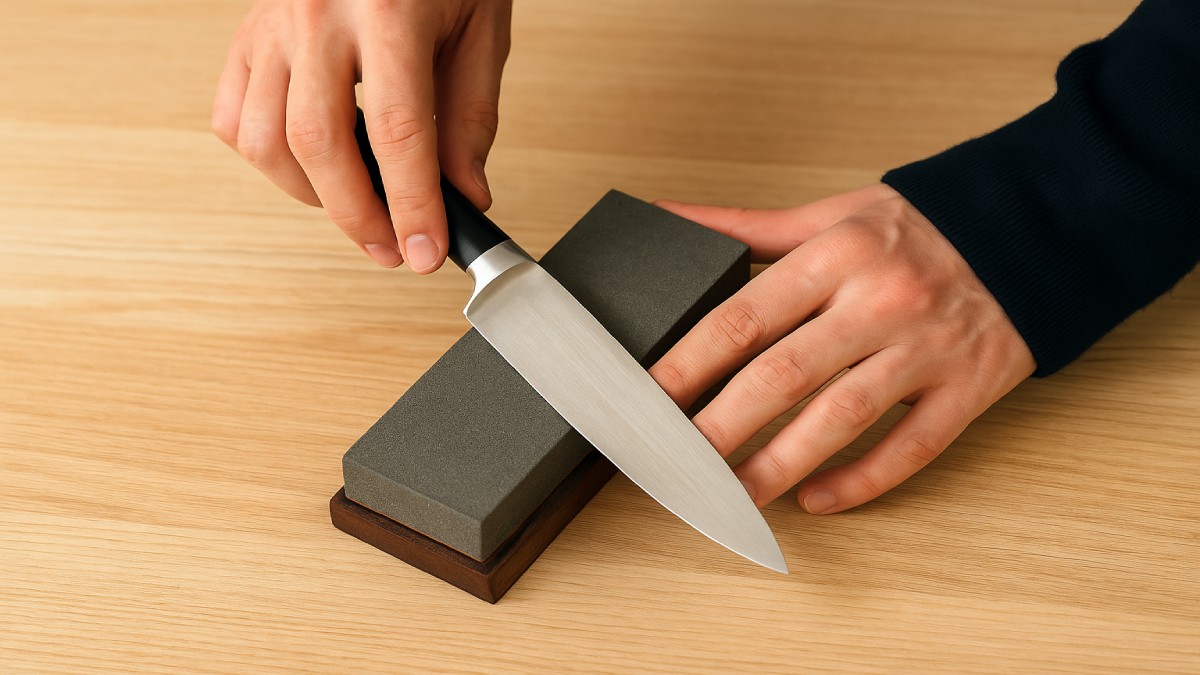
2) Establish the Bevel (Medium Grit ~#1000)
Set the knife at your target angle. For a chef’s knife on a 1,000-grit stone, draw the blade with controlled strokes from heel to tip. Think of painting the edge onto the stone while keeping the angle steady. Use light to moderate pressure—firm enough to cut, gentle enough to avoid digging. Work one side until you form a continuous burr from heel to tip. Then switch sides and repeat until the burr flips over.
3) Refine the Edge (Fine Grit #3000–#6000)
Move to a finer stone. Use lighter strokes and equal time on both sides. Your focus now is deburring and polishing. Finish with a few trailing strokes per side, almost weightless, to remove the last wire edge.
4) Optional: Strop for Extra Bite
A leather strop with polishing compound boosts keenness and smoothness. Use minimal pressure and pull the blade away from the edge to avoid rounding the apex. A few light laps per side are enough.
Angle Control: Tricks That Keep You Consistent
The most common sharpening issue is a wandering angle. Small changes compound across the blade and leave you with an uneven bevel.
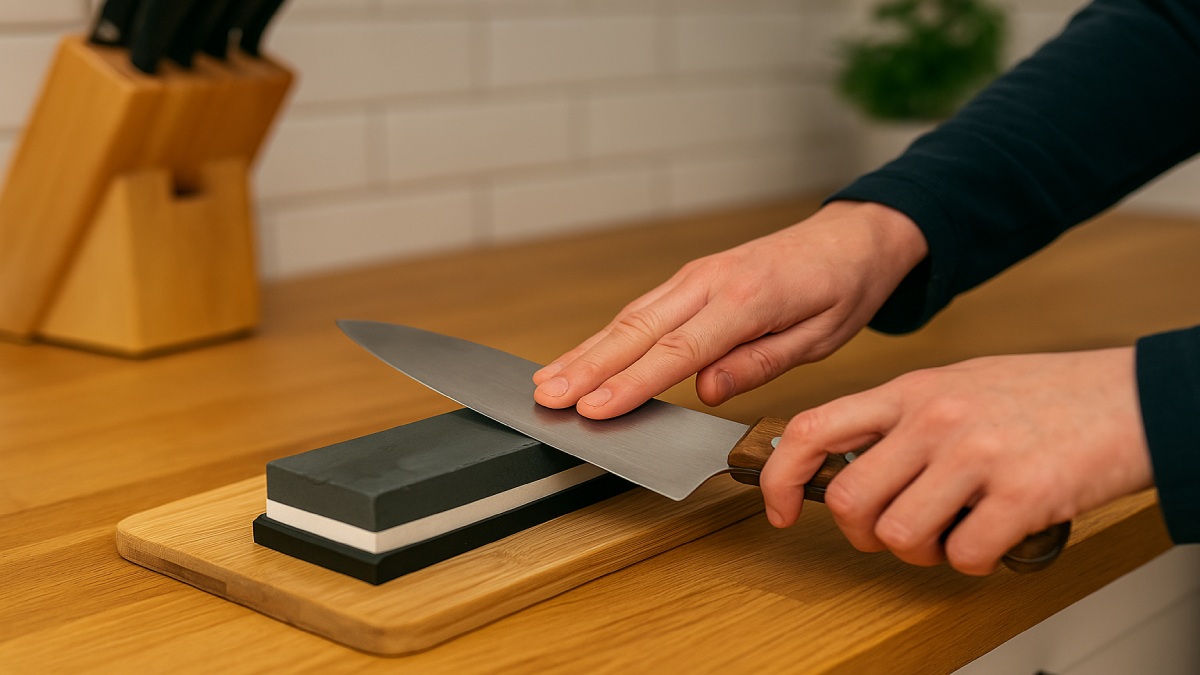
- Index the spine: Rest your off-hand fingers lightly on the spine to stabilize pitch.
- Use reference taps: Each time you reset at the heel, tap the spine twice to the same height before the stroke.
- Count strokes: Match pressure and stroke count per side while you learn the feel of symmetry.
- Mark the bevel: A dry-erase marker on the bevel shows contact; remove color evenly for a true angle.
Special Cases: Serrations, Cleavers, and Thin Slicers
Serrated Kitchen Knives
Use a tapered ceramic or diamond rod that fits each gullet. Stroke from the back of the gullet outward, then lightly deburr the flat side on a fine stone or strop. Work patiently; you’re restoring tiny cutting points, not grinding them away.
Hefty Cleavers and Butcher Knives
These blades do impact work. Favor a tougher angle near 20–25° per side and stop at a modest polish. A little tooth helps them bite into cartilage and dense product.
Thin Japanese Slicers
Keep the angle low, near 12–15° per side, and use a refined progression. Light pressure preserves geometry. These blades cut best with a silky, push-cut edge.
Utility Knives: Replace or Sharpen?
For box cutters and snap-off blades, replacement is the best practice. Fresh edges cost little, save time, and stay predictable. If you must sharpen, use a fine diamond plate at a relatively high angle and keep expectations realistic. Always retract the blade when you set the tool down and dispose of dull blades in a dedicated container.
Testing Sharpness Safely
Skip dangerous tests that risk your fingers. Safer checks tell you more anyway.
- Paper slice: A sharp edge slices printer paper from the heel cleanly without snagging.
- Tomato skin: The edge should break skin on contact with almost no pressure.
- Light reflection: Under bright light, a dull edge reflects along the apex; a keen edge disappears.
- Shave test (caution): A brief, careful pass on arm hair indicates bite; avoid pressing hard or repeating often.
Cutting Boards, Care, and Edge Life
The surface under your blade dictates how long the edge lasts. Soft end-grain wood and high-quality plastic boards protect the apex. Glass, granite, and ceramic destroy edges fast. Wash knives by hand, dry immediately, and avoid dishwashers that can knock blades into other utensils and leach heat into tempered steel.
Common Mistakes and Simple Fixes
- Grinding without a burr: If you never raise a burr, you likely didn’t reach the apex. Stay on the current stone longer.
- Too much pressure: Heavy hands gouge the stone and deform the apex. Let the abrasive do the work.
- Skipping grits: Jumping from coarse to fine leaves deep scratches beneath a polish; the edge feels dull sooner.
- Over-stropping: Excessive pressure can round the edge. Use light, trailing passes only.
- Thick shoulder buildup: Frequent pull-through grinding can create a wedge behind the edge. Reset with a proper bevel on stones.
Maintenance Rhythm: How Often to Hone and Sharpen
Build a simple schedule around your cooking habits. Home cooks who prep most nights can hone weekly and sharpen every three to six months. If you cook occasionally, a quick hone before big prep days may be enough, with sharpening two or three times a year. Professionals often sharpen weekly and hone throughout service. The moment you feel the blade sliding instead of biting, refresh it.
Storage That Protects the Edge
Good edges are fragile at the microscopic level. Treat them like fine instruments. Use a slotted block, a magnetic strip with a soft backer, or edge guards in a drawer. Keep blades from clashing with other tools. A minute of care saves an hour at the stone.
Quick Reference: A Beginner’s Stone Progression
- Assess: If the knife is very dull or damaged, start at #400–#800. Otherwise begin at #1000.
- Sharpen at #1000: Raise a continuous burr, heel to tip. Flip and repeat.
- Refine at #3000–#6000: Light, even strokes. Remove the burr completely.
- Strop lightly: Ten feather-touch passes per side on compound.
- Hone as needed: A few gentle rod strokes before cooking sessions keep the edge aligned.
Frequently Asked Questions
Can I sharpen on sandpaper if I don’t own stones?
Yes. Mount wet-dry paper (e.g., 800, 1200, 2000) on a flat glass or granite tile. Keep it wet, use light pressure, and maintain angle. It’s a solid interim solution.
What’s the best first stone to buy?
A quality #1000 stone is the workhorse. Pair it with a #3000–#6000 finisher as your second purchase. Add a coarse stone only if you repair chips or set new bevels.
Do I need a steel if I have a ceramic rod?
A ceramic rod covers most needs and works well on many modern kitchen steels. Use light passes. If you prefer a traditional steel, keep pressure minimal to avoid over-rolling the apex.
How do I sharpen ceramic knives?
Many home stones won’t cut advanced ceramic efficiently. A diamond abrasive is required. If the blade is chipped, professional service is the safer route.
Is stropping required?
Not required, but it improves glide and cleans residual burr. Go easy—just a few light passes. If the edge loses bite, return to a fine stone for a couple of strokes.
Troubleshooting: If the Edge Still Feels Dull
Work through this short checklist:
- No burr formed? Stay longer on the current grit with steady angle and controlled pressure.
- Burr won’t vanish? Use lighter trailing strokes on the fine stone, then strop very lightly.
- Toothy but drags on tomato skin? Your shoulder may be thick. Reset the bevel at #800–#1000 with consistent angle.
- Edge chips quickly? Increase angle slightly or stop at a slightly coarser finish for more bite and durability.
Safety Essentials During Sharpening
Keep fingertips clear of the edge path and move slowly. Wipe the blade between stones so grit doesn’t carry over. Dry the knife thoroughly before storage to prevent corrosion. Place a rubber mat under your station to catch drips and keep your bench from getting slick. When you finish, clean stones per the manufacturer’s advice and store them flat.
From First Sharpen to Lasting Habit
The first successful session changes how you cook. Slices look even, herbs stay bright, and fine cuts take less time. Keep a simple log of angles, stones, and stroke counts for your main knives. Repeat what works and tweak what doesn’t. After a few cycles, muscle memory takes over and you’ll wonder how you ever worked with dull edges.
Conclusion: Sharpen Smart, Cut with Confidence
Knife sharpening is a craft built on small, repeatable moves. Hold a steady angle, raise a burr, refine it, and protect your progress with sane habits at the cutting board and the sink. Hone lightly between sessions, store blades so they never collide, and refresh the edge before it fails. With this approach, your kitchen knives will glide through prep, your utility blades will stay safe and predictable, and your time at the counter will feel better every day.