Guide to Properly Use a Tape Measure for Accurate Dimensions
Learn pro techniques to read fractions fast, control the hook for true-zero accuracy, and mark workpieces so your cuts fit the first time.
Accurate measurements are the foundation of every clean build and snug fit. A cabinet that rubs, shelving that comes up short, or molding with visible gaps usually traces back to a tape error of just a hair. The good news: a handful of simple habits turn a common tape measure into a precision tool you can trust for cabinetry, trim, flooring, and weekend DIY projects.
This guide walks through the parts of a tape and why they matter, then shows practical techniques for outside, inside, and depth measurements. You’ll pick up fast-reading tricks for fractional inches, pro tips like “burn an inch,” and layout methods that reduce math so errors can’t sneak in. Keep your tape handy—by the end, you’ll measure like a seasoned installer.
Meet the Tape: Anatomy That Drives Accuracy
A tape measure looks simple, yet every feature is tuned for precision. When you know what each part contributes, you can measure faster and with fewer mistakes.
The Floating Hook and “True Zero” Compensation
The end hook is supposed to move. That small play equals the hook’s thickness so measurements remain “true zero” both ways. Hook the tape over an outside edge and the hook shifts outward by its thickness; press the hook against an inside surface and it shifts inward the same amount. Result: no mental adjustment for the hook. For reliable measurements, keep the hook straight, the rivets snug, and avoid using the hook as a pry tool. If you suspect drift, check the hook against a known reference—such as a steel rule—and re-bend gently until the line at 1 inch matches.
Blade Curve, Width, and Standout
That concave curve isn’t cosmetic. It stiffens the blade so it can extend farther before collapsing—this is called standout. Wider, thicker blades stand out longer, which helps on solo measurements across a room or along sheet goods. Keep the blade aligned and flat to the surface during the final read; even a slight bow near the mark introduces error. On very long spans, support the blade mid-run with a helper or a clamp so it doesn’t sag.
Lock Strength and Case Length
A confident lock holds the blade exactly where you set it. If the lock slips, your mark moves. Quality tapes often add a secondary finger brake for quick control during retraction. One more detail: many tapes print the case length on the back. When you measure inside a cabinet, push the case against one wall, pull the blade to the opposite wall, and add the printed case length. It beats kinking the blade into a corner.
Read the Tape Like a Pro
Misreads often come from rushing the last ½ inch. Slow down at the mark, square your eye, and use a sharp marking tool. The payoff is huge—repeatable, clean results with fewer test fits.
Master the Fractional Scale
Most DIY-grade imperial tapes break each inch into sixteenths. The longest ticks mark halves, mid-length ticks mark quarters, then eighths, then sixteenths. Don’t count every small line. Instead, anchor on the nearest landmark. For example, if the line sits just past the ¾ mark, you’re likely at 13/16, 7/8, or 15/16; verify by a quick glance at those smaller intervals rather than recounting from zero. Say the fraction out loud while you mark—it locks it into memory and reduces transposition mistakes on a cut list.
Metric, Dual Scales, and Reverse-Read Blades
Many modern tapes offer dual scales. Metric shines on projects that call for tight repeats or international plans because millimeters remove fractions entirely. Reverse-read blades print the numbers so you can read left-to-right while the case sits on the right side of your work; that keeps your body posture natural and reduces flipping the tape in tight spaces.
Kill Parallax
Read directly over the mark, not from an angle. Keep the blade flat so the graduation lies on the same plane as your work. If the surface is glossy, use a knife to score the mark at the exact graduation instead of a fat pencil line. A light knife score centers the “true” mark and guides a saw tooth for precise starts.
Techniques for Outside, Inside, and Depth Measurements
The same tape behaves differently on edge catches, cabinet interiors, and vertical runs. Use these patterns to keep your technique consistent and accurate.
Outside Measurements: Hook and Tension
For outside reads, catch the edge firmly with the hook. Pull the blade taut, then set the lock so the tape doesn’t creep while you mark. Place your eye directly over the graduation and mark with a fine pencil or a knife. When measuring wide boards solo, pinch the hook to the far edge using a spring clamp or catch the hook’s nail slot on a temporary screw head. That anchors the zero end so you can stretch the blade one-handed without slipping.
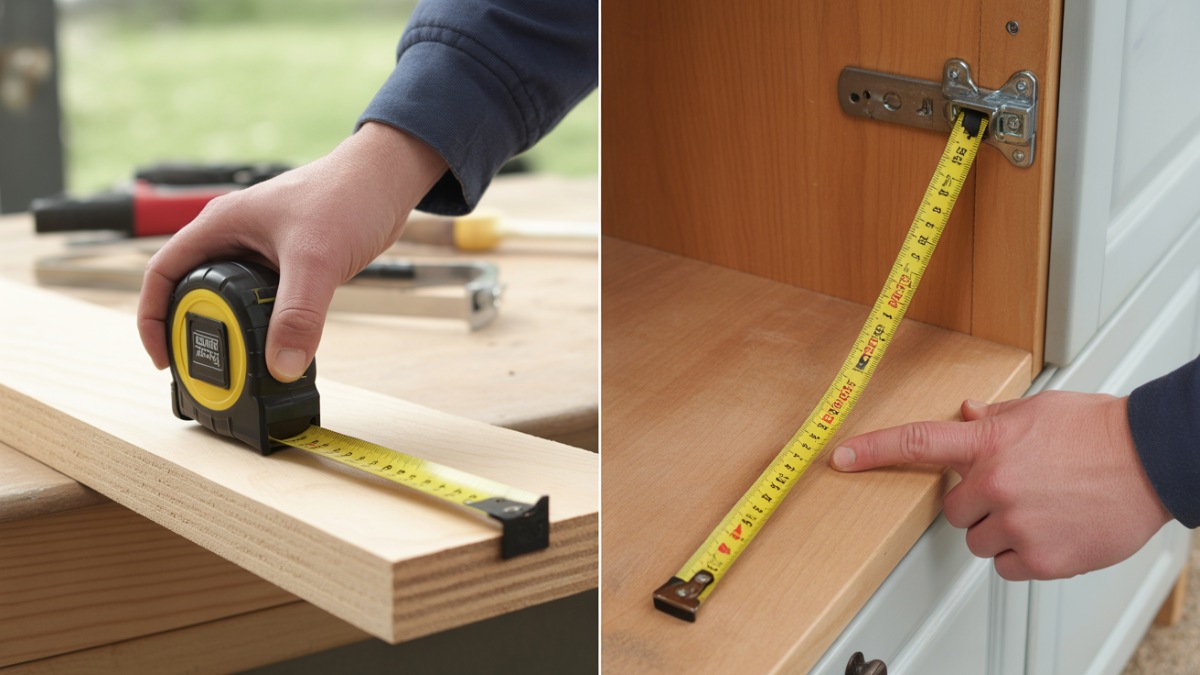
Inside Measurements: Push to True Zero
For inside corners—drawers, cabinets, window frames—push the case against one surface and extend the blade to the other. If your tape lists the case length, add that value to the reading on the blade. If not, use the hook properly: press the hook face-to-face against the inside wall so the floating rivets subtract the hook thickness. Keep the blade flat to avoid a bowed reading. When precision matters, measure twice from both sides and average the results.
Depth, Height, and Vertical Runs
For depth (like mortises or pocket holes), drop the hook into the recess and rest the blade against the near surface. Read the depth where the surface intersects the graduation. For tall vertical runs, steer the blade up the wall, lock at the target height, then place a light pencil tick at the exact line. If the blade wants to collapse, extend in stages or use painter’s tape as a temporary height marker that you can sight quickly.
Advanced Accuracy: Tricks the Pros Rely On
Past a certain point, accuracy is about removing sources of error rather than chasing them with math. These methods do exactly that.
The “Burn an Inch” Method
On delicate work or when the hook looks suspect, start your measurement at the 1-inch mark instead of the hook. Align the 1-inch graduation with your starting edge, hold firm, and read the dimension at the destination mark. Subtract one inch from that reading. For long runs, some carpenters burn 10 inches for easier math, then subtract 10. Keep consistent: if you burn on the first mark, burn on matching marks for mirrored parts so your pieces stay uniform.
Prevent Blade Sag on Long Runs
Over distance, the blade can arc. That shortens the measured span compared with a perfectly straight line. Support the blade at mid-span with your free hand, a clamp, or a helper. On layouts longer than the safe standout, place reference marks in sections and connect them using a straightedge. Another tactic: snap a chalk line at the calculated dimension and confirm with the tape in several spots along that line.
Fight Environmental Drift
Temperature affects steel blades. In a hot garage or direct sun, a long measurement can drift slightly. For cabinet-grade work, measure and cut in similar temperature conditions, especially when trimming to a tight opening. Let materials acclimate to the room before final measuring and cutting.
Story Sticks and Physical Transfer
The more you measure and write, the more chances for slip-ups. A story stick fixes that. Use a straight scrap to record key dimensions as physical marks, then transfer those marks to each part. Several brands offer write-on areas on the tape blade; those help, but a rigid stick removes blade stretch, parallax, and transcription errors in one move.
Standards, Classes, and What the Labels Mean
Not all tapes claim the same accuracy. If you build kitchens, built-ins, or anything that must fit a fixed opening, pay attention to the print on the blade and case.
NIST and Practical Tolerances
In the U.S., commercial measuring devices follow tolerances rooted in national standards. You won’t test your tape in a metrology lab, yet the idea still matters: a short tape should be very close to dead-on across its full length. If you constantly chase fit problems with the same tape, check it against a reliable steel rule or a calibrated yardstick. Replace any tape that drifts or whose hook won’t hold true after adjustment.
EC Accuracy Classes
Metric and dual-scale tapes often carry a Class mark: Class I indicates a tighter maximum error than Class II. For general carpentry, Class II is common and adequate. For fine trim, built-ins, or shop jigs, the tighter class is worth seeking out when available.
Modern Features That Boost Repeatability
Feature sets have improved. Magnetic hooks latch to steel, reducing slips. Nail-grab slots catch a screw or brad for one-person layout. Dual locks combine a thumb lock with a finger brake for better control. Wider blades improve standout. Reverse-read printing and bold foot markers speed framing layout. Choose features that solve your daily pain points rather than the flashiest color or case.

Marking and Transferring Measurements That Fit the First Time
Great measuring fails if you mark poorly. Your layout line is the physical truth your saw will follow, so treat it with care.
Knife vs. Pencil
A sharp knife makes a micro-thin score you can register with a chisel or saw tooth. It’s ideal for hardwood, veneered plywood, and any show surface. A mechanical pencil with a 0.5 mm or 0.7 mm lead works for framing and drywall. Whichever you use, mark on the waste side and decide in advance which edge of the line the blade will remove. That keeps parts consistent—no guessing mid-cut.
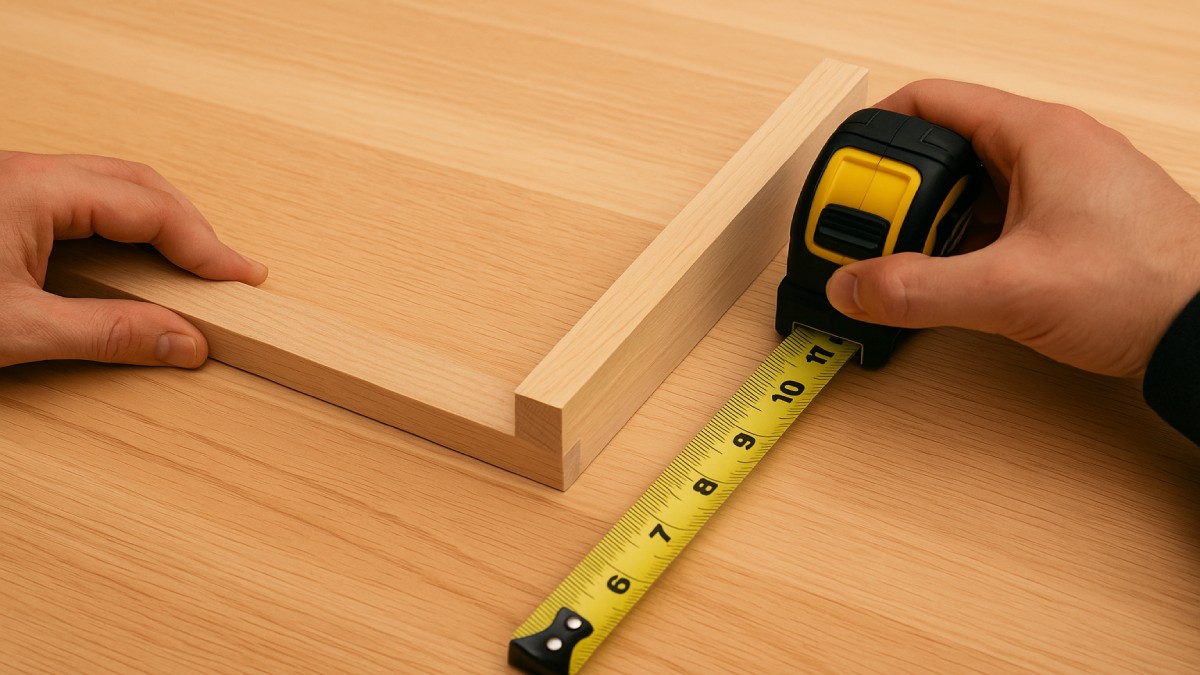
Register the Tape, Then the Square
For crosscuts, place the tape, mark the line, then register a combination square on that mark to draw a short, perfectly square reference. On sheet goods, extend the line with a long straightedge or track saw guide. For repetitive parts, clamp a stop block at the miter saw so each piece hits the same length without re-measuring.
Transfer Without Math Whenever Possible
Whenever parts need to match an existing opening—shelves inside an alcove, a filler panel next to a cabinet—take direct transfer measurements. Hold the workpiece in place and scribe against the actual surfaces. Direct scribing beats arithmetic, especially in old houses where nothing is perfectly square.
Maintenance Habits That Protect Accuracy
A well-cared-for tape lasts for years and reads true day after day. Neglect bends hooks, chips blades, and ruins the very accuracy you rely on.
Control Retraction
Slamming the blade back into the case can mushroom the hook and loosen rivets. Guide the blade in with your thumb as it retracts; it’s safer for fingers and better for the tool. If the return spring feels weak or gritty, clean the blade and add a light silicone wipe so grit doesn’t grind into the coating.
Keep the Hook True
Inspect the hook regularly. If it’s bent outward or twisted, your outside measurements will run long or short. Lay the blade alongside a steel rule and verify the 1-inch mark. Straighten with small pliers in tiny steps, testing often. If the rivets are sloppy, retire the tape—permanent play defeats true zero.
Clean and Store Dry
Wipe pitch and dust from the blade with a mild cleaner; dry thoroughly and apply a thin protective film. Store the tape in a dry box. Moisture and grit creep into the case and shorten the life of the spring and blade coating.
Common Questions, Clear Answers
Why does the hook move?
It compensates for the hook’s thickness so both outside and inside reads begin at the true zero. If the hook didn’t float, you’d need to add or subtract every time. Some movement is correct; excessive wobble is not.
Should I burn an inch every time?
No. Use true zero for speed. Burn an inch only on delicate work, when the hook can’t catch cleanly, or if you suspect the hook took a hit. Be consistent within a project.
How do I measure inside a cabinet accurately?
Use the case-length method if your tape prints it: press the case to one side, extend to the other, and add the case length. Or push the hook firmly to engage true zero, keeping the blade flat and your eye square to the graduation.
Why are my long measurements off?
Likely culprits are blade sag, parallax, temperature drift, or a slipping lock. Support the blade mid-span, read directly above the line, and measure in stable conditions. Confirm the hook calibration if problems persist.
Is a wider blade always better?
Wider blades deliver more standout, which helps on solo jobs. For small shop work, a narrower, flexible blade may read more comfortably on tight interiors. Pick based on your most common tasks.
Project Scenarios: Put the Skills to Work
Let’s apply the methods to real tasks. These scenarios show how minor changes in technique prevent costly re-cuts.
Floating Shelves Between Two Walls
Measure the opening at the front, middle, and back, then use the smallest value. Push the case for inside reads and add the printed case length. Transfer those marks to a story stick. When you cut the shelves, reference the story stick instead of measuring again; the shelves will drop in clean.
Installing Baseboard in an Older Room
Rooms shift over time. Measure each wall in sections, then scribe outside corners and cope inside corners using knife marks as guides. At the miter saw, set a stop so repeating lengths match perfectly. Confirm with a dry fit before nailing.
Cabinet Filler Panel Next to a Range
Heat and tile lines highlight even tiny gaps. Take a direct transfer by holding the panel blank in position and scribing against the real surfaces. Use that knife line as your cut line. A tape backs up your scribe, but the scribe rules.
Quick Reference: Best Practices Checklist
- Keep the hook straight; verify true zero against a reliable rule.
- Square your eye to the mark; hold the blade flat to the work.
- Use knife scores for show faces; mark on the waste side.
- Support long spans to prevent sag; set the lock before marking.
- Measure and cut in similar conditions for tight fits.
- Adopt story sticks and stop blocks to reduce math and repeats.
- Retract under control; clean and store the tape dry.
Conclusion: Measure Twice, Cut Once, Fit Perfectly
Tapes fail us only when technique slips. Control the hook for true zero, read from the correct angle, support the blade on long runs, and mark with intent. Use story sticks to eliminate math on repeated parts. Keep the tool healthy and it will return the favor with years of trustworthy service.
Precision is a habit more than a talent. Practice these steps on your next build and you’ll feel the difference—parts that meet without force, trim that lands flush, and a workflow that moves forward without rework. Your projects will look better, go faster, and feel far less stressful.